How to Replace Wheel Bearing Hub Assembly 1998-2004 Chevy S10 Pickup Part 1
Created on: 2010-05-04
When you watch this video, 1A Auto teaches you how to replace your 98-04 Chevy S10 pickup's wheel bearing and hub assembly.
-
step 1 :Remove the wheel and tire
- Loosen your hub nut with your 35 mm socket.
- Loosen your lug nut with your 19 mm lug wrench.
- Raise and secure the vehicle.
- Remove the lug nuts and then the wheel, remove the hub nut.
-
step 2 :Remove Brake Caliper
- Turn wheels all the way in the opposite direction of the side you are working on.
- Use your 18 mm socket wrench to remove the caliper bolts.
- Use a wrench to pry the caliper off.
- Use a wire tie to help prevent stress on the caliper.
-
step 3 :Remove Brake Rotor
- Take care not to touch the disk, and if you do make sure to clean it with rubbing alcohol or mineral spirits.
-
step 4 :Remove Hub
- Remove the clips for the hub harness.
- Use a screwdriver to unclip the hub harness.
- Unbolt the hub harness.
- Remove the 3 bolts securing the hub using your 18mm socket and ratchet or breaker bar.
- You can use penetrating oil to help.
- Remove the hub, using driving tools to help work it out of the steering knuckle.
- Clean up any corrosion with a wire brush.
-
step 5 :Install new hub
- Use some penetrating oil to prep the knuckle for the new hub.
- Put the three 18mm bolts in place and tighten the nuts to 65 ft lbs.
-
step 6 :Put brakes and wheel back on
- Refer to our other videos for more detailed instructions.
- Remember to replace the lug nuts on in a star pattern.
- Lug nuts tighten to 95 ft lbs
- Hub nut is 75 ft lbs.
- Make sure to check your brakes and steering before driving again.
- Make sure to have the vehicle aligned.
Tools needed
-
1/2 Inch Breaker Bar
10mm Socket
11mm Socket
12mm Socket
13mm Socket
13mm Wrench
14mm Socket
15mm Socket
16mm Socket
17mm Socket
18mm Socket
18mm Wrench
19mm Socket
35mm Socket
Anti-Seize Grease
Floor Jack
Jack Stands
Lug Wrench
Pry Bar
Ratchet
Rust Penetrant
Torque Wrench
Wire Brush
While 1A Auto strives to make the information provided in this video as accurate as possible, it makes no claims, promises, or guarantees about the accuracy, completeness or applicability of the content. No information contained in this video shall create any expressed or implied warranty or guarantee of any particular result. All do-it-yourself projects entail some risk. It is the sole responsibility of the viewer to assume this risk. 1A Auto is not responsible or liable for any loss damage (including, but not limited to, actual, consequential, or punitive), liability, claim, or any other injury or cause related to or resulting from any information posted in this video.
Brought to you by 1AAuto.com-- your source for quality replacement parts and the best service on the internet.
Hi, I'm Mike Green. I'm one of the owners of 1AAuto. I want to help you save time and money repairing and maintaining your vehicle. I'm going to use my 20+ years experience restoring and repairing cars and trucks like this to show you the correct way to consult parts from 1AAuto.com. The right parts installed correctly, that's going to save you time and money. Thank you and enjoy the video.
In this video we'll be showing you how to replace a front hub on this four wheel S10 Truck, same as any 97 to present S10 or Blazer. Tools you'll need are metric sockets, 10mm-19mm, 18mm and 13mm wrenches, Jack and Jack Stands, 35mm Socket for the Hub Nut, Large Screwdriver or a Pry bar, some Penetrating Oil and a Torque wrench to put it back together.
Okay so first, if you're using hand tools, you're going to want to loosen your Log Nuts up and that's going to do with a 19mm wrench and you want to do this on the ground obviously because that way the wheels won't be moving. Then the other thing you're going to want to do is you're going to want to use your 34mm socket, 35mm actually. Now I'm going to raise the car up and secure it. Okay, so I've raised the wheel. I'm working on up off the ground. By putting the jack under there and then actually I have jack stand under the frame here and that's what's really going to hold the weight. Now I'm going to remove the tire. Now I could remove the center hub nut and the washer. Okay, now I'm going to remove my brake caliper by removing this bolt here and then down on the backside, this bolt here. Okay, they're 18mm bolts.
Okay now I'm going to use my wrench just pry the caliper right off then rest it right up here. Take the disc off. Now I'm going to remove the clips for the hub harness here and here. Okay and then the harness goes right up in here. Okay, and I just disconnected it. Then you can just use a screwdriver. I can't really. That's why you need a screwdriver to pry it up out of the frame there. Okay. Here's how I'm just coating those two little nuts with penetrating oil and then I'm going to take the small one off. Actually, I'm going to finish prying that clip up and out and now I'm going to take the small one off with a 10mm wrench. Okay and here this next shot, I'm actually showing you how to get the wrench up in behind there to hold that bolt. That's where you want to place the wrench in order to hold the bolt on the other side and not here. I'm just removing that clip bolt.
Okay and here I'm just finishing up taking out that bolt. Actually like to cut up the bolt and the nut back into the control arm just for safe keeping so that I know where they are. Here is the last clip that's on the frame. This is a 13mm bolt and so I'm unbolting from the frame here. Now I just pull in harness out and free and I'm going to pull the clips off the harness so I can put them on to the new hub harness when I'm ready to install it. Now you want to remove your hub just three bolts, one in the back, one in the middle and the top and then one over here in the front.
These are 18mm bolts. Okay so front and rear ones you can get to with an impact wrench or a regular wrench. The top one is a little more difficult. You have to use a hand wrench and it helps if you swivel the steering that helps you get to the bolts that much easier. Then as you can see as I'm taking them out, you can pry with a pry bar or a large screwdriver. Replaces one right back here. There's a little place that in the flange that you can get a screwdriver into and pry against the steering knuckle and then also in behind right where the steering knuckle is here on in the front and you can see me get it apart now. I'm just shaking it. You want to be careful not to bend that backend plate too much. Basically I lead that top bolt in. It's very loose but it's still in there. Now you can see the hub comes right out and hold the harness out and away from the backend plate and your hub is out.
There's this little rubber o-ring that you want to make sure it goes back on correctly. Okay so here's the new one with the hubs off versus the old one. See the leads are all the same, has the same bracket, same end. It's going to mount the same. Everything's going to be all the same. Okay so ends the removing of the hub. Reinstalling is pretty easy. It's a reverse of procedure and obviously you need to use a torque wrench, torque the small bolts to 65 foot-pounds and the hub nut to 95 foot-pounds as well as your lug nuts, it's 75 foot-pounds. We do have this detailed in another video. That is a reply to this video. Also, you can just search for S10 hub and find the installation video.
We hope this helps you out. Brought to you by www.1AAuto.com-- your source for quality replacement parts and the best service on the internet. Please feel free to call us toll free 888-844-3393. We're the company that's here for you on the internet and in person.
Shop Products


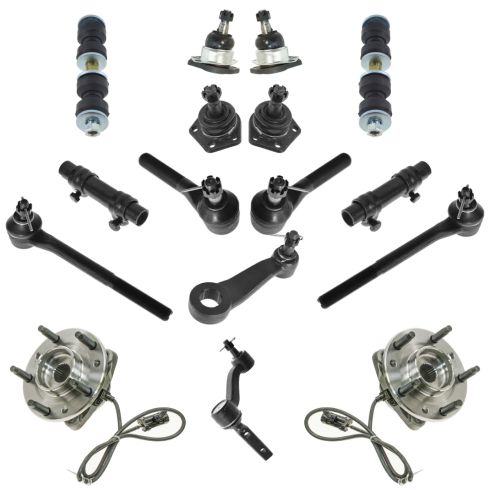
Chevrolet GMC Olds Isuzu Front 16 Piece Steering, Suspension, & Drivetrain Kit TRQ PSA59278
Part Details:
- Ball Bearing
- 16 Piece
- (2) Front Sway Bar Links
- (2) Front Lower Ball Joints
- (2) Front Outer Tie Rods
- (2) Front Tie Rod Adjusting Sleeves
- (2) Front Upper Ball Joints
- (1) Pitman Arm
- (2) Front Inner Tie Rods
- (2) Front Wheel Bearing & Hub Assemblies
- (1) Idler Arm & Bracket Assembly

How to Replace Wheel Bearing Hub 2000-05 Chevy Monte Carlo
Learn how to replace the rear wheel bearing and e-brake on the 00-05 Chevy Monte Carlo with the steps in this how-to video
While 1A Auto strives to make the information provided in this video as accurate as possible, it makes no claims, promises, or guarantees about the accuracy, completeness or applicability of the content. No information contained in this video shall create any expressed or implied warranty or guarantee of any particular result. All do-it-yourself projects entail some risk. It is the sole responsibility of the viewer to assume this risk. 1A Auto is not responsible or liable for any loss damage (including, but not limited to, actual, consequential, or punitive), liability, claim, or any other injury or cause related to or resulting from any information posted in this video.
