How to Replace Tie Rod 1996-2007 Ford Taurus
Created on: 2010-12-14
Watch this video to learn how to replace the outer tie rod in a 96-07 Ford Taurus.
-
step 1 :Remove Wheel
- Remove lug nuts and remove wheel.
-
step 2 :Remove tie rod
- Remove cotter pin.
- Use your tie rod puller to pull the tie rod up.
- Use your two adjustable wrenches to remove the tie rod.
-
step 3 :Install new tie rod
- Use the old nut to mark the bolt with tape.
- Use a vice grip and an adjustable wrench to remove the nut, using penetrating oil if need be.
- Replace bolt with new one, compensating for any difference in width.
- Use your two adjustable wrenches to tighten the nut up against the tie rod end.
- Use your torque wrench to tighten up the nut on the end of the tie rod and put the cotter pin in.
- Put the grease fitting in.
- Use grease gun to fill boot with grease.
-
step 4 :Put wheel back on
- Use the star pattern to tighten the lugs to 90 to 100 ft lbs.
Tools needed
-
8mm Wrench
Ratchet
Needle nose pliers
Grease Gun
18mm Socket
Adjustable Wrench
Tie Rod Puller
Vise-Grips
19mm Socket
While 1A Auto strives to make the information provided in this video as accurate as possible, it makes no claims, promises, or guarantees about the accuracy, completeness or applicability of the content. No information contained in this video shall create any expressed or implied warranty or guarantee of any particular result. All do-it-yourself projects entail some risk. It is the sole responsibility of the viewer to assume this risk. 1A Auto is not responsible or liable for any loss damage (including, but not limited to, actual, consequential, or punitive), liability, claim, or any other injury or cause related to or resulting from any information posted in this video.
Brought to you by 1AAuto.com, your source for quality replacement parts and the best service on the internet.
Hi, I'm Mike Green. I'm one of the owners of 1A Auto. I want to help you save time and money repairing or maintaining your vehicle. I'm going to use my 20-plus years' experience restoring and repairing cars and trucks like this to show you the correct way to install parts from 1AAuto.com. The right parts installed correctly. That's going to save you time and money. Thank you and enjoy the video.
In this video we'll be showing you how to replace the tie rod on this 2001 Ford Taurus. It is the same procedure for any 1996 to 2007 Taurus. Tools you'll need: 18 mm socket and ratchet as well as a 19 mm socket or your lug wrench to get the wheel off, adjustable wrenches, needle-nose pliers, vice grips, some penetrating oil probably, a tie rod puller tool or a tie rod fork and hammer or actually you can use a hammer to get the tie rod out just be careful not to mushroom the end, 8 mm wrench and a grease gun with grease.
When your car goes for a State inspection a lot of times you'll see them jack the front of your car up and move the wheel around. What they're looking for is loose front-end parts, and basically if you shake the wheel- if you take the wheel on the top and bottom and go up and down and you can feel a clunking that's an indication of your upper or lower ball joint. If you can take the wheel on the sides and go back and forth that's an indication of your tie rod. If it actually does both then you need to figure out if you can take it and in any way shake it and you're feeling some looseness then that can be an indicator that your hub is loose. It also can be an indicator that your ball joints and your tie rods could be loose.
This is your tie rod end right here, and when you move the wheel back and forth if you look very closely you'll see that there's movement in relation to the steering knuckle and the tie rod. Using a 19 mm socket or your lug wrench, remove the tire. I am going to pull out the cotter pin. Sometimes it's easier to break it right off with a pair of pliers. It is pretty obvious why this tie rod failed. This is the grease zerk, and it's rusted and dry, which means it doesn't look like this was ever serviced. You want to make sure on your car you are always taking it to get oil changes and making sure that they're greasing things at the same time. I'm going to remove this 18 mm nut. You want to separate the tie rod from the steering knuckle, and there is right ways and there is wrong ways. One of the right ways is with this tool, which is a tie rod puller tool. It goes right on there and then pushes it out. You could use a fork, and then basically a hammer and you drive this fork right in between and it pops it out. You can, but you need to be very careful, you could use a hammer and a tool and beat the tie rod up and out like that. What you have to be careful of is that you don't mushroom the end of the tie rod so it doesn't go through the steering knuckle cleanly. If you do it this way what you might want to do is put a bolt on the end here, put your bolt back on the end and then hit it using that bolt so that you hit the bolt and you don't ruin the tie rod.
What I'm going to do is use this tool and mine happens to be a 19 mm here. It just kind of came right out. Interesting. As you can see I've got two adjustable wrenches on here. I've got one on the tie rod itself and then one on the nut back here and I'm just going to pull on the nut one to loosen it up. I'm going to loosen it up just a half a turn. I'm gonna lift this up and out I'm going to twist off the tie rod end. Here is my old tie rod, my new tie rod. I'm going to compare them. Lengthwise they're the same so we know that if we mount the new tie rod the same exact way we should have a good preliminary alignment. A new tie rod comes with a new nut as well. The new nut is basically the same width as the old one. What I'm going to do is take a piece of tape and I'm going to put it onto the shaft to mark where my old one is. I'm going to use a pair of vice grips to lock onto the shaft and see if we can get this bolt off. If necessary you want to use a bit of penetrating oil to see if you can't loosen it up. I've got my vice grips on here and after soaking this with a bunch of penetrating oil and letting it sit for a while I'm able to undo the nut here.
After looking at them right side by side the new nut is just slightly thinner than the old one. What we'll do is we'll just leave one thread between where the new one goes on and the tape just to compensate for that. That should give us a good preliminary alignment. After you do a repair like this you really should go and get the car aligned. Now with your ball joint take the nut off and move that plastic cap that is just protecting the rubber boot. Go slowly until it's up to the nut. Take our vice grips off here and install it. Put the nut on here. Take our two big wrenches again here and make sure that nut is nice and tight up against our tie rod end.
Here we use our torque wrench and you want to torque this bolt between 35 and 40 foot pounds, once it clicks. Then we'll check the hole where you want to put the cotter pin through and if you need to you just tighten it up a little bit more so you can get that cotter pin through there. Now we'll put the new cotter pin in, bend it down and around. Bend that around and we'll put this grease fitting in. Just use our pliers and we'll tighten that up with the proper 8 mm wrench. Now we've got our grease gun, pop it on there. Basically, pump some grease into it, and now you can see the grease actually coming up and around the edge there. That's enough. That's good and full of grease. We will actually check the grease on the other side and put the wheel back on and we'll be all set.
I'm going to just fast forward putting the wheel back on. What you want to do is put on all the lug nuts by hand. Then I just tighten them up kind of preliminarily with my gun and then on the ground torque them to 90 to 100 foot pounds using a star pattern as you tighten.
We hope this helps you out. Brought to you by www.1AAuto.com, your source for quality replacement parts and the best service on the internet. Please feel free to call us toll free, 888-844-3393.
Shop Products


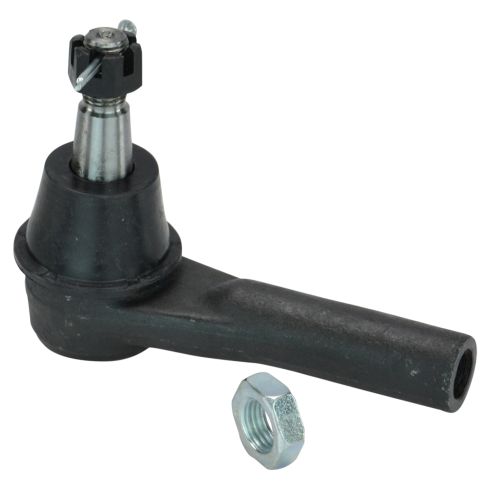
Ford Taurus Mercury Sable Front Tie Rod TRQ PSA68463
Part Details:
- No
- Steel
- Yes
- Steel
- Female
- Male
- Yes
- E-Coated
How to Replace Inner Tie Rod 2001-05 Chrysler Sebring
Check out this video on how to replace the inner tie rods on your 01-05 Chrysler Sebring. We'll show you how to get the job done!
While 1A Auto strives to make the information provided in this video as accurate as possible, it makes no claims, promises, or guarantees about the accuracy, completeness or applicability of the content. No information contained in this video shall create any expressed or implied warranty or guarantee of any particular result. All do-it-yourself projects entail some risk. It is the sole responsibility of the viewer to assume this risk. 1A Auto is not responsible or liable for any loss damage (including, but not limited to, actual, consequential, or punitive), liability, claim, or any other injury or cause related to or resulting from any information posted in this video.
