How to Replace Sway Bar Link 2001-06 Hyundai Elantra
Created on: 2013-05-17
If the sway bar link is rattling or broken, this video will show what steps and tools are needed to replace it
-
step 1 :Removing the Wheel
- Loosen the lug nut covers with a 22mm socket
- Loosen the lug nuts with the vehicle on the ground
- Raise the vehicle with a floor jack
- Secure the vehicle on jack stands
- Remove the lug nuts
- Pull off the wheel
-
You may need to use a second wrench for extra leverage
step 2 :Removing the Stabilizer Link
- Turn the wheel by hand
- Hold the upper stabilizer link stud with a 14mm or 9/16 inch wrench
- Remove the upper nut from the stabilizer link with a 14mm wrench
- Hold the lower stabilizer link stud with a 14mm or 9/16 inch wrench
- Remove the lower nut from the stabilizer link with a 14mm wrench
- Pull off the stabilizer link
-
step 3 :Reinstalling the Stabilizer Link
- Push the stabilizer link into place
- Start the 14mm nuts by hand
- Hold the upper stabilizer link stud with a 14mm or 9/16 inch wrench
- Fasten the upper nut onto the stabilizer link with a 14mm wrench
- Hold the lower stabilizer link stud with a 14mm or 9/16 inch wrench
- Fasten the lower nut onto the stabilizer link with a 14mm wrench
-
step 4 :Reattaching the Wheel
- Slide the wheel into place
- Start the lug nuts by hand
- Tighten the lug nuts preliminarily with a 22mm socket
- Lower the vehicle to the ground
- Tighten the lug nuts to between 100 foot-pounds in a crossing or star pattern
Tools needed
-
Floor Jack
14mm Wrench
22mm Socket
9/16 Inch Wrench
Jack Stands
Ratchet
Torque Wrench
While 1A Auto strives to make the information provided in this video as accurate as possible, it makes no claims, promises, or guarantees about the accuracy, completeness or applicability of the content. No information contained in this video shall create any expressed or implied warranty or guarantee of any particular result. All do-it-yourself projects entail some risk. It is the sole responsibility of the viewer to assume this risk. 1A Auto is not responsible or liable for any loss damage (including, but not limited to, actual, consequential, or punitive), liability, claim, or any other injury or cause related to or resulting from any information posted in this video.
Brought to you by 1AAuto.com, your source for quality replacement parts and the best service on the Internet.
Hi, I'm Don from 1A Auto. I hope this how-to video helps you out, and the next time you need a part for your vehicle, think of 1AAuto.com. Thanks.
In this video, we're going to show you how to remove and reinstall a stabilizer link. We do the right-hand side, but the left-hand side is the same. We do recommend you do these in pairs. If one of them is bad, chances are the other one is either bad or going to go bad. You will need jack and jack stands to lift your vehicle, a 22mm socket and ratchet with probably a breaker bar to remove the lug nuts, then either two 14mm wrenches, or you could get by with a 14mm and a 9/16ths wrench.
Start by removing one of the front wheels. If you don't have the benefits of air tools, you'll want to start with the vehicle on the ground. Loosen the lug nuts, jack up and secure the vehicle on jack stands, remove the lug nuts, the wheel cover, wheel, and tire. If I turn the wheel, I get a little bit better access for my wrenches.
We use 14mm wrenches to hold the back side of the sway bar link and for the nut. Then I'm going to put a wrench in here to help me get a little bit extra leverage to break the nut free. Okay, and fast-forward as we remove that nut the rest of the way. I'm going to use my 14 to counter hold, like I did on the top. I'll use a 14 to break it free. Okay, and as you can see there what we do is we put the wrench on and then just hook another wrench onto the end. Just to give yourself some extra leverage. Helps you break the nut free. Now two nuts free, and then pull your sway bar link out.
Now I'm installing the link back into the sway bar and to the controller. Okay, and a nice shot of our elbow there. What you can see once you've got it out, it's a pretty easy process to get it back in. You might have to just kind of manipulate the link a little bit to get it to go through the stabilizer bar and the control arm. But then put the nuts on, pretty much hand tight. Then use your two 14mm wrenches. We also used two 14mm wrenches. And you could also use a 14 and a 9/16ths if you had to. You basically want to get them about as tight as you can with a wrench. Then just hook your wrench on and just give it another pull. It's about a quarter of a turn using both wrenches.
Put the wheel back in place. Put the hubcap on and start your lug nuts. Then you just want to kind of hand-tighten them. Hand-start them first to make sure you don't cross the threads. Then once they're hand-started, just kind of preliminarily tighten them up. And with the car back on the ground, with a little bit of pressure on it, or weight on it, I will use the 22mm and a torque wrench that I've set to 100 foot-pounds, and I torque them in a star pattern.
We hope this video helps you out. Brought to you by www.1AAuto.com, your source for quality replacement parts and the best service on the Internet. Please feel free to call us toll-free, 888-844-3393. We're the company that's here for you on the Internet and in person.
Shop Products


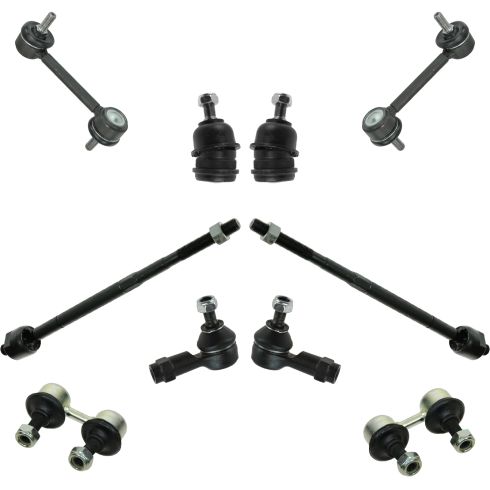
2001-06 Hyundai Elantra Front & Rear 10 Piece Steering & Suspension Kit TRQ PSA59265
Part Details:
- 10 Piece
- (2) Front Sway Bar Links
- (2) Rear Sway Bar Links
- (2) Front Lower Ball Joints
- (2) Front Outer Tie Rods
- (2) Front Inner Tie Rods

How to Replace Sway Bar Link 1998-2000 Volvo S70
If the sway bar link is rattling or broken, this video will show what steps and tools are needed to replace it.
While 1A Auto strives to make the information provided in this video as accurate as possible, it makes no claims, promises, or guarantees about the accuracy, completeness or applicability of the content. No information contained in this video shall create any expressed or implied warranty or guarantee of any particular result. All do-it-yourself projects entail some risk. It is the sole responsibility of the viewer to assume this risk. 1A Auto is not responsible or liable for any loss damage (including, but not limited to, actual, consequential, or punitive), liability, claim, or any other injury or cause related to or resulting from any information posted in this video.
